Volkswagen, Audi, Skoda, Seat: PQ26 platform

List of PQ26 based cars:

Volkswagen Polo Mk5 Facelift (Typ 6C, 2014–2018), Škoda Fabia Mk3 (Typ NJ, 2014–present), Škoda Rapid (2017) (2017-2019), New Skoda Rapid MY 2020+, Volkswagen Polo-Sedan MY 2020+

Available Coding & service features for PQ26-based cars:

Assistance

  • 1. Power steering support power
  • 2. Steering mode
  • 3. Steering mode selection activation
  • 4. Torque steering compensation (TSC)

Backup

  • 1. All units backup
    Creates full backup of all long coding and all adaptation values. Takes a very long time!
  • 2. Backup copy of unit 01
  • 3. Backup copy of unit 02
  • 4. Backup copy of unit 03
  • 5. Backup copy of unit 08
  • 6. Backup copy of unit 09
  • 7. Backup copy of unit 10
  • 8. Backup copy of unit 17
  • 9. Backup copy of unit 19
  • 10. Backup copy of unit 44
  • 11. Backup copy of unit 5F

Battery

  • 1. Battery capacity (Ah)
  • 2. Battery manufacturer
    Maximum length = 3 symbols
  • 3. Battery serial number
    Maximum length = 10 symbols
  • 4. Battery technology

Brakes (ABS, ESP, XDS, etc.)

  • 1. ASR system adaptation
  • 2. Brake booster adaptation
    Possible range: from 0 to 15
  • 3. Brake disc drying
    Brakes are lightly applied automatically on regular intervals to keep the brake discs dry and ready for maximum braking
  • 4. EDS system settings
  • 5. ESC Off menu
    Options to display in ESC off menu: ASR off, ESC off, ESC Sport
  • 6. HBA (brake assist) adaptation
  • 7. Hill Hold control activation
    HCC prevents roll-back
  • 8. Hill Hold control adaptation

Climate

  • 1. Front glass heater temperature threshold (C)
    Minimum step 0.5 C
  • 2. Front glass heater time before turning off (seconds)
    Minimum step – 40 seconds
  • 3. Rear glass heater temperature threshold (C)
    Minimum step 0.5 C
  • 4. Rear glass heater time before turning off (seconds)
    Minimum step – 40 seconds
  • 5. Remember last air recyrculation position (with Climate control)
  • 6. Remember last air recyrculation position (without Climate control)

Dashboard

  • 1. Dashboard dial lights always on
  • 2. Dashboard pointers lights always on
  • 3. Display ECO/efficiency hints
  • 4. Display oil temperature
  • 5. Remove key warning
  • 6. Show free space in fuel tank in the dashboard
  • 7. Show lap timer
  • 8. Test pointers at engine start
  • 9. Time format (24/12)
  • 10. Units: Date format
  • 11. Units: Distance
  • 12. Units: Fuel consumption (gasoline/diesel)
  • 13. Units: Pressure
  • 14. Units: Speed
  • 15. Units: temperature
  • 16. Units: Time format (12/24)
  • 17. Units: Volume

Dashboard: lighting adjustment

  • 1. Scales day brightness calibration: point 1: brightness value
  • 2. Scales day brightness calibration: point 1: sensor value
  • 3. Scales day brightness calibration: point 2: brightness value
  • 4. Scales day brightness calibration: point 2: sensor value
  • 5. Scales day brightness calibration: point 3: brightness value
  • 6. Scales day brightness calibration: point 3: sensor value
  • 7. Scales day brightness calibration: point 4: brightness value
  • 8. Scales day brightness calibration: point 4: sensor value
  • 9. Scales day brightness calibration: point 5: brightness value
  • 10. Scales day brightness calibration: point 5: sensor value
  • 11. Scales day brightness calibration: point 6: brightness value
  • 12. Scales day brightness calibration: point 6: sensor value
  • 13. Scales night brightness calibration: point 1: brightness value
  • 14. Scales night brightness calibration: point 1: sensor value
  • 15. Scales night brightness calibration: point 2: brightness value
  • 16. Scales night brightness calibration: point 2: sensor value
  • 17. Scales night brightness calibration: point 3: brightness value
  • 18. Scales night brightness calibration: point 3: sensor value
  • 19. Scales night brightness calibration: point 4: brightness value
  • 20. Scales night brightness calibration: point 4: sensor value
  • 21. Scales night brightness calibration: point 5: brightness value
  • 22. Scales night brightness calibration: point 5: sensor value
  • 23. Scales night brightness calibration: point 6: brightness value
  • 24. Scales night brightness calibration: point 6: sensor value

Doors, Locking and Unlocking

  • 1. Auto lock doors after speed threshold was reached
  • 2. Auto unlock doors
  • 3. Auto unlock doors when selector in parking
  • 4. Autolock rear part of the vehicle
  • 5. Driver door power window shut off delay after ignition was turned off (seconds)
    Maximum = 1275 seconds, step = 5 seconds
  • 6. Electric window on driver door comfort control using key fob
  • 7. Enable key open/close functions while engine running
  • 8. Lock menu in MMI
  • 9. Unlock doors options (new gen. BCM)
  • 10. Unlock doors options (old gen. BCM)

Engine and powertrain

  • 1. Accelerator pedal high sensivity
    Not recommended for cars with cruise control
  • 2. Accelerator pedal response algorythm (variant 2)
    Better sensivity with “direct” value
  • 3. Throttle adaptation
    In some cases this procedure improves reaction on accelerator pedal for a period of time

Exterior lights

  • 1. Blink DRL with turn signal
    PQ26: Skoda Rapid
  • 2. Blink front DRL with turn lights
    PQ26, Confirmed on Skoda Rapid
  • 3. Blink front side lights with turn lights + front side lights turns off when low beam active
    PQ26: Skoda Rapid
  • 4. Coming home activation (trim with light sensors)
  • 5. Coming home activation (trim without light sensors)
  • 6. Coming home/Leaving home lights
  • 7. Corner function with front fog lights
    PQ26, Confirmed on Skoda Rapid
  • 8. Corner function: regulation
    ECE R119 – works when the steering wheel is turned and when the turn signal is turned on with a 1 second delay
    ECE R48 – only works when you turn the steering wheel
    FMVSS 517 108 – works when the steering wheel is turned and when the turn signal is turned on
  • 9. Corner function: upper speed threshold
    Maximum speed threshold for corner lights activation. Minimum step = 0.5 km/h
  • 10. Disable license plate light when tailgate is opened
  • 11. DRL: DRL menu item in Multimedia system (MMI)
  • 12. DRL: Turn off DRL when parking brake activated
  • 13. DRL: Turn off when light switch in off position
    DRL = Daytime running lights
  • 14. Emergency braking lights
  • 15. Front side light dimming when turn signal blinking
    PQ26: Skoda Rapid
  • 16. LED DRL dimming when turn signal flashing
    PQ26: Skoda Rapid
  • 17. LED DRL working with low beam
    PQ26: Skoda Rapid
  • 18. License plate: light type (LED/5W)
  • 19. Limit the maximum number of simultaneously burning front lights to 2 types
    This is often used for stroboscope effect
  • 20. Rear side lights active with DRL
    PQ26: Skoda Rapid
  • 21. Stroboscope effect when blinking high beam + front fog lights
    PQ26: Skoda Rapid
  • 22. Stroboscope effect when blinking high beam + LED DRL
    PQ26: Skoda Rapid
  • 23. Stroboscope effect when blinking high beam + low beam
    PQ26: Skoda Rapid
  • 24. Turn lights: polite blinks count
    After applying this option reset light settings to factory defaults in car multimedia menu
  • 25. Turn on stop lights on the side of opened door
    PQ26: Skoda Rapid
  • 26. Turn on stop reverse light with Coming home or Leaving home functions
    PQ26: Skoda Rapid
  • 27. Turning on side direction indicators when opening the boot
    PQ26: Skoda Rapid
  • 28. US-style sidelight with turn signals
    PQ26: Skoda Rapid
  • 29. US-style sidelight with turn signals (only when light switch in side lights position)
    PQ26: Skoda Rapid

Feedback signals

  • 1. Acoustic feedback: activation or deactivation global setting
  • 2. Acoustic feedback: duration when using signal horn
  • 3. Acoustic feedback: menu in MMI
  • 4. Acoustic feedback: use signal horn
  • 5. Acoustic feedback: when locking
  • 6. Acoustic feedback: when second close command
    Quittierton bei zweitem ZV-ZU-Befehl
  • 7. Acoustic feedback: when unlocking
  • 8. Confirmation sound when locking and unlocking central lock
  • 9. Optical feedback: use 3rd brake light
  • 10. Optical feedback: when comfort closing windows
  • 11. Optical feedback: when locking

Interior lights

  • 1. Smooth turn on buttons light
  • 2. Turn on interior light when tailgate opened

Lighting adaptations

  • 1. 0 BLK VL B35
    Usually front left turn signal
  • 2. 1 BLK VR B23
    Usually front right turn signal
  • 3. 2 SL VL B22
    Usually front left side light
  • 4. 3 SL VRB36
    Usually front right side light
  • 5. 4 TFL LB43
    Usually front left DRL
  • 6. 5 TFL RB6
    Usually front right DRL
  • 7. 6 ABL LB44
    Usually low beam left
  • 8. 7 ABL RB5
    Usually low beam right
  • 9. 8 FL LB42
    Usually high beam left
  • 10. 9 FL RB7
    Usually high beam right
  • 11. 10
  • 12. 11 WARNBLK TASTER C54
  • 13. 12 NL LB40
    Usually left fog light
  • 14. 13 NL RB3
    Usually right fog light
  • 15. 14 LOCKUNLOCK61
  • 16. 15 SAFE LED C55
  • 17. 16 BLK SLC11
    Left side turn light
  • 18. 17 BLK SR A72
    Right side turn light
  • 19. 18 BLK HLA71
    Usually rear left turn light
  • 20. 19 BLK HRC8
    Usually rear right turn light
  • 21. 20 BR LA70
    Usually left stop-signal
  • 22. 21 BR RC8
    Usually right stop-signal
  • 23. 22 BR MC9
    Usually 3rd stop-signal
  • 24. 23 SL HLC7
    Usually rear left side light
  • 25. 24 SL HRA69
    Usually rear right side light
  • 26. 25 KZL HA60
    Usually number plate light
  • 27. 26 NSL A65
    Usually rear left fog light
  • 28. 27 KL58XS C67
    Terminal 58xs dimmer
  • 29. 28 RFL C3
    Usually rear left reverse light
  • 30. 29 KL30G A69
    Usually inside locker lights
  • 31. 30 INNENLICHT A68
    Usually foot light
  • 32. 31 AMBL 1C65
  • 33. 32 AMBL 2C64
  • 34. 33 AMBL 3C72
  • 35. 34 AMBL 4C71
  • 36. 35 LED Warnblinktaster C48

Long coding

  • 1. 01. Engine
  • 2. 02. Transmission
  • 3. 03. Braking system
  • 4. 04. Power steering
  • 5. 05. Authorization system for access and starting the engine
  • 6. 06. Front passenger seat
  • 7. 08. Heater and climate
  • 8. 09. Onboard supply control unit
  • 9. 09. Onboard supply control unit -> Subsystem 1 (Wipers/Rain sensor)
  • 10. 09. Onboard supply control unit -> Subsystem 2 (RLHS)
  • 11. 0E. Media player 1
  • 12. 10. Parking Assistant 2
  • 13. 11. Engine Electronics No. 2
  • 14. 13. Active cruise control
  • 15. 14. Email system Damping controls
  • 16. 15. Srs
  • 17. 16. Steering column
  • 18. 17. Dashboard
  • 19. 18. Additional heater
  • 20. 19. CAN Gateway
  • 21. 1B. Active steering
  • 22. 21. Energy Management 2
  • 23. 22. Four-wheel drive
  • 24. 23. Increased braking force
  • 25. 25. Immobilizer
  • 26. 26. Electric folding roof
  • 27. 28. Climate Control Panel
  • 28. 32. Differential lock electronics
  • 29. 34. Ride height control system
  • 30. 36. Driver seat adjustment
  • 31. 37. Navigation system
  • 32. 3C. Lane change assistant
  • 33. 3D. Special function
  • 34. 42. Driver door electronic equipment
  • 35. 44. Power steering
  • 36. 47. Acoustic system
  • 37. 51. Electric drive
  • 38. 52. Front passenger door electronics
  • 39. 53. Parking brake
  • 40. 55. Headlights corrector
  • 41. 57. Tv tuner
  • 42. 5F. Electronic Information System 1
  • 43. 65. TPMS
  • 44. 69. Trailer functions
  • 45. 6C. Rear view camera system var.1
  • 46. 6D. Boot lid
  • 47. 6F. Comfort system central module 2
  • 48. 6С. Rear view camera system var.2
  • 49. 71. Charger
  • 50. 75. Emergency Call and Communication Module
  • 51. 76. Parking assistant
  • 52. 77. Telephone
  • 53. 7F. Electronic Information System 2
  • 54. 94. Srs
  • 55. 95. Esp
  • 56. A5. Front Assistant A5
  • 57. BB. Rear door behind driver
  • 58. BC. Rear door behind passenger

Multimedia

  • 1. Access trip computer in multimedia when ignition turned off”
  • 2. AM radio
    Enable or disable AM radio
  • 3. AUX input activation
  • 4. Confirmation of installation changes
    Used after updating firmware, parts, POI, etc. to remove error 1555
  • 5. Display comfort systems consumption in MMI
  • 6. Display driving school mode in MMI
  • 7. Microphone sensivity
  • 8. Mirror link in motion speed threshold (MIB2)
    Use this to activate MirrorLink in motion
  • 9. Mirror link in motion speed threshold (MIB3)
    Use this to activate MirrorLink in motion
  • 10. MMI startup screen display time (seconds)
    Minimum step = 0.5 sec
  • 11. MMI USB activation
  • 12. Rear speakers activation after installation: 4 channels/6 passive speakers
  • 13. Rear speakers activation after installation: 4 channels/8 passive speakers
  • 14. Restart mutltimedia system
    After applying some codings you need to restart your multimedia system for changes to take effect
  • 15. Show offroad screen in multimedia system (Swing-3)
    Compatibility: Swing-3
  • 16. Swing/Bolero startup screen
  • 17. Video in motion speed threshold (MIB2)
    Use this to activate Video in motion
  • 18. Video in motion speed threshold (MIB3)
    Use this to activate Video in motion

Multimedia: sound quality

  • 1. Activate Skoda Skoda Suround, Virtual Subwoofer (not compatible with CANTON)
    Enables Skoda Suround, Virtual Subwoofer and disables voice transmission to rear passengers. Don’t use with CANTON! MIB3 not supported.
  • 2. Skoda only: individual sound processing preset (MIB2 Entry/Swing 2 before 2017 with SW. ver. 6xxx, MIB2 STD)
    This feature changes sound configuration preset when you have activated Skoda Virtual Subwoofer & Skoda Surround. Not compatible with CANTON!
  • 3. Skoda only: individual sound processing preset (MIB2 Entry/Swing2 after 2017, GP/Swing3 with SW. ver. 7xxx, 8xxx)
    This feature changes sound configuration preset when you have activated Skoda Virtual Subwoofer & Skoda Surround. Not compatible with CANTON!
  • 4. Sound processing preset (MIB2)
    This feature changes sound configuration to improve sound quality
  • 5. Sound system type (MIB2)
    Not compatible with MIB3!

Service and maintenance

  • 1. AISIN automatic transmission service procedures
  • 2. Distance since last mileage-dependent inspection (km)
  • 3. DSG adaptation (DQ200, DQ250, DQ500)
  • 4. Mass DTC clear in most of units
    This feature clears DTC codes in most of units in just one click (takes 1 second)
  • 5. Max. distance until next mileage-related inspection (km)
  • 6. Max. time until next time-dependent inspection (days)
  • 7. Maximum distance between service (km)
    Step = 100 km
  • 8. Maximum distance to service
    Step = 100 km
  • 9. Maximum time between service (days)
  • 10. Mileage since last service (km)
  • 11. Minimum distance between service (km)
    Step = 100 km
  • 12. Minimum time between service (days)
  • 13. Reset service interval reminder
  • 14. Reset value for next mileage-dependent inspection (km)
  • 15. Reset value for next time-dependent inspection (days)
  • 16. Time since last service (days)
  • 17. Time since last time-dependent inspection (days)

Service reminder reset

  • 1. Reset inspection service reminder
    One click solution to reset inspection service interval
  • 2. Reset oil service reminder
    One click solution to reset oil service interval

Sounds and alarm

  • 1. Activate anti-theft alarm system
  • 2. Alarm on door opening with ignition turned on
  • 3. Horn working when ignition turned off
  • 4. Seat belts alerts
  • 5. Seat belts alerts style

Tire pressure monitoring system (TPMS)

  • 1. Indirect TPMS system activation (part #1)
    Uses ABS sensors to warn about low pressure in tires.
  • 2. Indirect TPMS system activation (part #2)
    Uses ABS sensors to warn about low pressure in tires.
    This part should be applied only after a cycle of restarting all modules on your car.
  • 3. Reset TPMS adaptation (for TPMS based on ABS sensors)

Wipers and washers (windshield, rear glass, headlights)

  • 1. Headlight washer duty duration
    Minimum step = 10 ms
  • 2. Headlight washer interval
    Headlight washer interval runs at X washes of windshield. To disable automatic front light washer, change this value to 0
  • 3. Light sensor sensivity customization
  • 4. Park windshield wipers after ignition turned off
  • 5. Rear fog lights turned on warning when reaching speed limit
    Minimum step = 1 km/h, set 0 to disable warning
  • 6. Rear wiper automatic function
  • 7. Rear wiper comfort function
  • 8. Stop wipers when opening hood
  • 9. Stop wipers when opening hood
  • 10. Teardrop mode (additional wipers pass) on the rear glass
  • 11. Teardrop mode (additional wipers pass) on the windshield
  • 12. Turn on headlight washer after holding washer lever for XX ms
    Minimum step = 10 ms
  • 13. Windshield wiper service position activation through menu option
    Compatibility depends on installed MMI device.
  • 14. Windshield wipers defrost position

Other

  • 1. Automatic close doors at 15 km/h and open them when key removing
  • 2. Automatically close driver window after locking car (only for MY2019+)
  • 3. Automaticaly lock/unlock doors (for trims without color multimedia system)
  • 4. Electric windows working when ignition turned off
  • 5. Front fog lights: turn on fog when reversing
  • 6. Start-stop function deactivation (temperature method)
  • 7. Start-stop function deactivation (voltage method)

WARNING!
1) Coding & Service requires good ELM327 with full command set support.
2) Coding compatibility may depend on your car trim level and control units versions.

Volkswagen, Audi, Skoda, Seat: MLB-EVO platform

Available coding and service features for Volkswagen, Audi, Skoda, Seat cars, based on MLB-EVO platform.

Assistance

  • 1. High beam assistance activation
    Requires assistance camera
  • 2. Lane assist: activation
    Requires assistance camera installed
  • 3. Lane assist: driver inactivity time threshold
  • 4. Lane assist: patch for Side assist
    Apply this patch if you have Audi side assist installed
  • 5. Lane assist: power steering support
  • 6. Lane assist: steering wheel vibration
    For A5 unit 8W6907217
  • 7. Lane assist: steering wheel vibration
    For A5 unit 8W6907217
  • 8. Switch-off speed for parking assist (km/h)

Brakes (ABS, ESP, XDS, etc.)

  • 1. Activate parking brake when ignition turned off

Climate

  • 1. Aux heater: engine temperature priority
  • 2. Aux heater: engine temperature priority
  • 3. Steering wheel heat level #1 (°C)
  • 4. Steering wheel heat level #2 (°C)
  • 5. Steering wheel heat level #3 (°C)
  • 6. Webasto warm interior + engine

Dashboard

  • 1. Display oil temperature
  • 2. Display oil temperature var.2
  • 3. Laptimer
  • 4. Pointer test (staging)
  • 5. Show acceleration
  • 6. Show free space in fuel tank in the dashboard
  • 7. TPMS menu in dashboard
  • 8. Units: Date format
  • 9. Units: Distance
  • 10. Units: Fuel consumption (gasoline/diesel)
  • 11. Units: Pressure
  • 12. Units: Speed
  • 13. Units: temperature
  • 14. Units: Time format (12/24)
  • 15. Units: Volume

Doors, Locking and Unlocking

  • 1. Enable menu item for auto-lock in the MMI
  • 2. Locking/Unlocking rear lid with Keyless entry while engine running
  • 3. Locking/Unlocking with Keyless entry while engine running
  • 4. Locking/Unlocking with remote key while engine running

Engine and powertrain

  • 1. Block DPF regenerations (diesel only)
    This prevents the automatic and manual regeneration of DPF. If you turn it on, make sure you regularly perform manual DPF regeneration. You will need to disable this option before manually regenerating DPF.

Exterior lights

  • 1. Activate taillight with DRL
  • 2. DRL menu in MMI
  • 3. Enable “Light for left-hand traffic” in the MMI
  • 4. Polite turn signals (1-5)

Interior lights

  • 1. Deactivate speakers light (driver side)
  • 2. Deactivate speakers light (passenger side)
  • 3. Switch on reading lights when opening doors

Long coding

  • 1. 01. Engine
  • 2. 02. Transmission
  • 3. 03. Braking system
  • 4. 04. Power steering
  • 5. 05. Authorization system for access and starting the engine
  • 6. 06. Front passenger seat
  • 7. 08. Heater and climate
  • 8. 09. Onboard supply control unit
  • 9. 09. Onboard supply control unit -> Subsystem 1 (Wipers/Rain sensor)
  • 10. 09. Onboard supply control unit -> Subsystem 2 (RLHS)
  • 11. 0E. Media player 1
  • 12. 10. Parking Assistant 2
  • 13. 11. Engine Electronics No. 2
  • 14. 13. Active cruise control
  • 15. 14. Email system Damping controls
  • 16. 15. Srs
  • 17. 16. Steering column
  • 18. 17. Dashboard
  • 19. 18. Additional heater
  • 20. 19. CAN Gateway
  • 21. 1B. Active steering
  • 22. 21. Energy Management 2
  • 23. 22. Four-wheel drive
  • 24. 23. Increased braking force
  • 25. 25. Immobilizer
  • 26. 26. Electric folding roof
  • 27. 28. Climate Control Panel
  • 28. 32. Differential lock electronics
  • 29. 34. Ride height control system
  • 30. 36. Driver seat adjustment
  • 31. 37. Navigation system
  • 32. 3C. Lane change assistant
  • 33. 3D. Special function
  • 34. 42. Driver door electronic equipment
  • 35. 44. Power steering
  • 36. 47. Acoustic system
  • 37. 51. Electric drive
  • 38. 52. Front passenger door electronics
  • 39. 53. Parking brake
  • 40. 55. Headlights corrector
  • 41. 57. Tv tuner
  • 42. 5F. Electronic Information System 1
  • 43. 65. TPMS
  • 44. 69. Trailer functions
  • 45. 6C. Rear view camera system var.1
  • 46. 6D. Boot lid
  • 47. 6F. Comfort system central module 2
  • 48. 6С. Rear view camera system var.2
  • 49. 71. Charger
  • 50. 75. Emergency Call and Communication Module
  • 51. 76. Parking assistant
  • 52. 77. Telephone
  • 53. 7F. Electronic Information System 2
  • 54. 94. Srs
  • 55. 95. Esp
  • 56. A5. Front Assistant A5
  • 57. BB. Rear door behind driver
  • 58. BC. Rear door behind passenger

Mirrors

  • 1. Comfort mirrors folding

Multimedia

  • 1.
    May be it’s compaible with Android Auto too
  • 2. Confirmation of installation changes
    Used after updating firmware, parts, POI, etc. to remove error 1555
  • 3. Disable AM-radio
  • 4. Display driving school mode in MMI
  • 5. Restart mutltimedia system
    After applying some codings you need to restart your multimedia system for changes to take effect
  • 6. Virtual display for Park assist

Seats

  • 1. Comfort entry (driver seat)
  • 2. Comfort entry (passenger seat)
  • 3. Passenget seat adjustment with driver’s seat keys (seat symmetry). Step 1/2
  • 4. Passenget seat adjustment with driver’s seat keys (seat symmetry). Step 2/2

Service and maintenance

  • 1. Distance since last mileage-dependent inspection (km)
  • 2. Distance since last service (km)
  • 3. DPF service regeneration while driving
  • 4. Mass DTC clear in most of units
    This feature clears DTC codes in most of units in just one click (takes 1 second)
  • 5. Max. distance until next mileage-related inspection (km)
  • 6. Max. time until next time-dependent inspection (days)
  • 7. Maximum distance between service (km)
    Step = 100 km
  • 8. Maximum distance to service
    Step = 100 km
  • 9. Maximum time between service (days)
  • 10. Minimum distance between service (km)
    Step = 100 km
  • 11. Minimum time between service (days)
  • 12. Reset service interval reminder
  • 13. Reset value for next mileage-dependent inspection (km)
  • 14. Reset value for next time-dependent inspection (days)
  • 15. Time since last service (days)
  • 16. Time since last time-dependent inspection (days)

Service reminder reset

  • 1. Reset inspection service reminder
    One click solution to reset inspection service interval
  • 2. Reset oil service reminder
    One click solution to reset oil service interval

Sounds and alarm

  • 1. Seat belts alerts
  • 2. Sound beep when locking/unlocking
    Requires manufacturer installed alarm system

Wipers and washers (windshield, rear glass, headlights)

  • 1. Headlight washers
    Use this to enable or disable headlight washer

Other

  • 1. 46 adapt template
  • 2. 4B adapt 1
  • 3. Battery capacity (Ah)
  • 4. Easy Entry
  • 5. Front PDS automatic activation
  • 6. Front PDS beep distance (cm)
  • 7. Start-stop function
    Deactivate start-stop
  • 8. Wireless Apple CarPlay

WARNING!
1) Coding & Service requires good ELM327 with full command set support.
2) Coding compatibility may depend on your car trim level and control units versions.
Volkswagen, Audi, Skoda, Seat: MQB platform

List of MQB based cars:
Audi A1 Mk2, Audi A3 Mk3, Audi A3 Mk4, Audi TT Mk3, Audi Q2, Audi Q3 Mk2, Cupra Formentor, Jetta VS5 (China), Jetta VS7 (China), SEAT Ibiza Mk5, SEAT León Mk3, SEAT León Mk4, SEAT Arona, SEAT Ateca, SEAT Tarraco, Škoda Kamiq, Škoda Karoq, Škoda Kodiaq, Škoda Octavia Mk3, Škoda Octavia Mk4, Škoda Scala, Škoda Superb B8, Volkswagen Arteon, Volkswagen Atlas / Teramont, Volkswagen Bora (China), Volkswagen Caddy Mk4 , Volkswagen Golf Mk7, Volkswagen Golf Sportsvan , Volkswagen Golf Mk8 , Volkswagen Jetta MK7 , Volkswagen Lamando (China), Volkswagen Lavida (China), Volkswagen Passat Mk8, Volkswagen Passat NMS (Chinese second generation), Volkswagen Polo Mk6, Volkswagen T-Cross, Volkswagen T-Roc, Volkswagen Tayron (China), Volkswagen Tharu/Tarek (China, Americas), Volkswagen Tiguan Mk2, Volkswagen Touran Mk2, Volkswagen Viloran (China)

Available Coding & service features for MQB-based cars:
All wheel drive (4WD)

  • 1. 4WD operation mode
    Haldex 5 acoustic algorythm model
  • 2. Diesel: Anti hum measures – Gear 4
  • 3. Diesel: Anti hum measures – Gear 5
  • 4. Diesel: Anti hum measures – Gear 6
  • 5. Diesel: Anti hum measures – Gear 7+
  • 6. Diesel: Anti impact measures – Gear 4
  • 7. Diesel: Anti impact measures – Gear 5
  • 8. Diesel: Anti impact measures – Gear 6
  • 9. Diesel: Anti impact measures – Gear 7+
  • 10. Gasoline: Anti hum measures – Gear 4
  • 11. Gasoline: Anti hum measures – Gear 5
  • 12. Gasoline: Anti hum measures – Gear 6
  • 13. Gasoline: Anti hum measures – Gear 7+
  • 14. Gasoline: Anti impact measures – Gear 4
  • 15. Gasoline: Anti impact measures – Gear 5
  • 16. Gasoline: Anti impact measures – Gear 6
  • 17. Gasoline: Anti impact measures – Gear 7+

Anti-theft alarm

  • 1. Anti-theft alarm system: activation
  • 2. Anti-theft alarm system: alarm signal style
  • 3. Anti-theft alarm system: camper mode
  • 4. Anti-theft alarm system: Deactivate by opening door lock.
    Highly not recommended!\nOriginal title: Schliesszylinder in_Richtung Oeffnen_aktiv (Thatcham inaktiv)
  • 5. Anti-theft alarm system: deactivate sensors in HMI
  • 6. Anti-theft alarm system: Disable cabin alarm sensor by double-click on lock button
  • 7. Anti-theft alarm system: monitor inside locking leaver
  • 8. Anti-theft alarm system: panic alarm delay
  • 9. Anti-theft alarm system: parking heater (webasto)
  • 10. Anti-theft alarm system: rear window break sensor
  • 11. Anti-theft alarm system: sensor for interior monitoring
  • 12. Anti-theft alarm system: siren alarms
  • 13. Anti-theft alarm system: sound device
  • 14. Anti-theft alarm system: tilt sensor
  • 15. Anti-theft alarm system: use signal horn for alarms

Assistance

  • 1. Activate road sign recognition system (Camera+Navigation system)
    Requires assistance camera 3Q0/3QD
  • 2. Activate road sign recognition system (for camera 5Q0 980 653)
    Requires assistance camera 5Q0 980 653
  • 3. Activate road sign recognition system (use only camera, no Navigation system installed)
    Requires assistance camera 3Q0/3QD
  • 4. Active cruise control mode depending on drive mode
    Depending on drive mode (enable) or custom selection over menu (disable)
  • 5. Adaptive lane assist
    Better detection of lane borders, keeps car in the middle of the lane
  • 6. Adaptive lane assist: patch for menu item activation
    Apply this patch only if adaptive line assistance menu in MMI is disabled (compatibility: A5 unit 3Q0/3QD)
  • 7. Anti-theft alarm system: delay before alarm system activated after locking car
  • 8. Assistance camera parametrization with Traffic Jam Assist, Road Sign Recognition and Emergency Assist support
    WARNING! Experimental feature! Compatibility depends on installed hardware and software versions!
    Only for Assistance Camera 3Q0980654 or 3QD980654
    Traffic Jam Assist allows using Lane assist below 65 km/h (requires Lane assist and adaptive Lane assist activated)
  • 9. Dynamic light assist for camera 3Q0
  • 10. Enable high beam assistant + save it’s state after turning off ignition
    Requires installed assistance camera 3Q0*/3QD*/5Q0*
  • 11. Fernlicht_assistent – Erweiterte Fernlichtassistent
  • 12. Lane assist activation (camera 3Q0*/3QD*)
    Requires assistance camera 3Q0 980 654/3D0 980 654
  • 13. Lane assist activation (camera 5Q0*)
    Requires assistance camera 5Q0 980 653
  • 14. Lane assist activation (for new camera 2Q0980653)
    Requires assistance camera 2Q0980653 (e.g. Skoda SuperB MK3 MY 2020+)
  • 15. Lane assist steering wheel vibrations
  • 16. Overtaking from the right prevention when using ACC
    By default adaptive cruise control wouldn’t allow you to overtake from the right if there’s a car with lower speed on a left lane, you can disable this.
  • 17. Park assist deactivation speed
  • 18. Power steering support power
  • 19. Road sign detection navigation patch
    Use navigation data for road sign detection or only camera
  • 20. Save state of high beam assist after turning off ignition
  • 21. Steering mode

Backup

  • 1. All units backup
    Creates full backup of all long coding and all adaptation values. Takes a very long time!
  • 2. Backup copy of unit 03
  • 3. Backup copy of unit 05
  • 4. Backup copy of unit 06
  • 5. Backup copy of unit 08
  • 6. Backup copy of unit 09
  • 7. Backup copy of unit 10
  • 8. Backup copy of unit 13
  • 9. Backup copy of unit 17
  • 10. Backup copy of unit 18
  • 11. Backup copy of unit 19
  • 12. Backup copy of unit 22
  • 13. Backup copy of unit 36
  • 14. Backup copy of unit 3C
  • 15. Backup copy of unit 42
  • 16. Backup copy of unit 44
  • 17. Backup copy of unit 47
  • 18. Backup copy of unit 52
  • 19. Backup copy of unit 5F
  • 20. Backup copy of unit 65
  • 21. Backup copy of unit 6C
  • 22. Backup copy of unit 6D
  • 23. Backup copy of unit A5

Battery

  • 1. Battery capacity (Ah)
  • 2. Battery manufacturer
  • 3. Battery serial number
  • 4. Battery technology

Brakes (ABS, ESP, XDS, etc.)

  • 1. Automatically turn on ESC after reaching speed 100 km/h
  • 2. Brake booster level
    Possible values: 1-8
  • 3. Brake disk drying
    Brakes are lightly applied automatically on regular intervals to keep the brake discs dry and ready for maximum braking
  • 4. Corner brake control
  • 5. Dynamic starting assist
    To get smooth start from Autohold set this option to “Early”
  • 6. Engine drag torque control
    Limits engine torque to reduce wheel hop on start
  • 7. ESC Off menu
    Options to display in ESC off menu: ASR off, ESC off, ESC Sport
  • 8. Hill Hold control activation
    HCC prevents roll-back
  • 9. Hill-start assistant
    Allows to start smoother with hill-start assistant (choose “early” option for that).
  • 10. Hill-start assistant activation threshold
  • 11. Hydraulic brake assistant
  • 12. Starting vibration reduction (ASR adaptation)
  • 13. Straight ahead brake stabilization
  • 14. XDS (expanded electronic differential system) activation
    XDS system applies brakes to inside wheel to improve steering at high speed
  • 15. XDS (expanded electronic differential system) adaptation
    XDS system applies brakes to inside wheel to improve steering at high speed

Climate

  • 1. Air quality sensor sensitivity
  • 2. AirCare system activation
  • 3. Automatic Activation of front windshield heater at MAX-Defrost
  • 4. Automatic drive wheel heater
  • 5. Automatic drive wheel heater: MY 2021 patch (with wheel heat button on the drive wheel)
    Experimental function!
  • 6. Blower adjustment in auto mode
  • 7. Disengage aux. heater (webasto)
  • 8. Display blower (fan) speed in auto mode
  • 9. Front glass heater temperature threshold (C)
    Minimum step 0.5 C
  • 10. Front glass heater time before turning off (seconds)
    Minimum step – 40 seconds
  • 11. Keep AirCare on after engine restart
  • 12. Rear glass heater temperature threshold (C)
    Minimum step 0.5 C
  • 13. Rear glass heater time before turning off (seconds)
    Minimum step – 40 seconds
  • 14. Save air recirculation state after turning off ignition
  • 15. Steering wheel heater: 3 levels / 1 level
  • 16. Temperature adjustment for hot countries
  • 17. Temperature threshold for activation of fresh air blower (only for cars with additional heater – Webasto)
    Min. step = 1 °C
  • 18. Unlock aux. heater (webasto)
  • 19. Ventilation flaps adaptation

Dashboard

  • 1. Active info display speedometer style
  • 2. Active info display tubes style
    Most of possible values repeats default style. Usually sport style can be found under variant #3
  • 3. Dashboard dial lights always on
  • 4. Dashboard LCD display background style
  • 5. Dashboard pointers lights always on
  • 6. Dashboard sport view combination
    Compatible with LCD-dashboard
  • 7. Digital (LCD) dashboard configuration menu in Multimedia system
  • 8. Disable “Turn on lights” warning
  • 9. Display oil temperature
  • 10. Display state of charge (SoC)
    Not compatible with LED dashboards
  • 11. Fuel consumption correction (%)
    Correction factor for fuel consumption and distance to empty
  • 12. Fuel tank level calibration: Complete tank calibration
  • 13. Fuel tank level calibration: Offset sensor 1
  • 14. Fuel tank level calibration: Offset sensor 2
  • 15. Fuel tank level calibration: Offset sensor 3
  • 16. Icy weather warning: low threshold
  • 17. Icy weather warning: upper threshold
  • 18. R-Logo
  • 19. Show acceleration
  • 20. Show ambient temperature
  • 21. Show free space in fuel tank in the dashboard
  • 22. Show lap timer
  • 23. Show warning when speed >120 km/h / 75 mph
  • 24. Startup screen for dashboard
    Results depends on car brand: Audi, VW, Skoda, Seat. Usually “sport” style is variant 3.
  • 25. Test pointers at engine start
  • 26. Time format (24/12)
  • 27. Units: Date format
  • 28. Units: Distance
  • 29. Units: Fuel consumption (gasoline/diesel)
  • 30. Units: Pressure
  • 31. Units: Speed
  • 32. Units: temperature
  • 33. Units: Time format (12/24)
  • 34. Units: Volume
  • 35. Wheel circumference
    Use this feature to adjust speedometer and odometer readings

Doors, Locking and Unlocking

  • 1. Activate Easy Open (Part 1)
    Requires hardware parts to be installed!
  • 2. Activate Easy Open (Part 2)
    Requires hardware parts to be installed!
  • 3. Auto lock doors after speed threshold was reached
  • 4. Auto unlock doors
  • 5. Auto unlock doors when selector in parking
  • 6. Autolock rear part of the vehicle
  • 7. Automatically lock car doors when key is outside of the car and all doors are closed
  • 8. Driver door power window shut off delay after ignition was turned off (seconds)
    Maximum = 1275 seconds, step = 5 seconds
  • 9. Enable key open/close functions while engine running
  • 10. Kessy active with ignition turned on
    Compatibility depends on car model.
  • 11. Lock menu in MMI
  • 12. Open and close windows holding key fob buttons
  • 13. Prevent all door opening with KESSY
    You can enable this feature to prevent opening your car with key fob retranslator. You’ll be able to open doors only with key fob.
  • 14. Prevent front door opening with KESSY
    You can enable this feature to prevent opening your car with key fob retranslator. You’ll be able to open doors only with key fob.
  • 15. Tailgate easy closing (locking car after using Easy close button)
  • 16. Tailgate opening and closing from key fob
  • 17. Unlock doors options
  • 18. Unlock menu in MMI

Engine and powertrain

  • 1. Accelerator pedal response algorythm
    Better sensivity with “direct” value
  • 2. Block DPF regenerations (diesel only)
    This prevents the automatic and manual regeneration of DPF. If you turn it on, make sure you regularly perform manual DPF regeneration. You will need to disable this option before manually regenerating DPF.
  • 3. Drive mode profiles editor
    Experimental feature for advanced users!
  • 4. Oil pump performance: second stage activation
  • 5. Save current drive mode profile after ignition was turned off
    Saving profiles state: Comfort, Eco, Sport, Individual, and saving gearbox, engine, ESC, light, settings.
  • 6. Throttle adaptation
    In some cases this procedure improves reaction on accelerator pedal for a period of time
  • 7. Torque steering compensation (TSC)

Exterior lights

  • 1. Coming home activation: automatic/manual
  • 2. Coming home automatic activation trigger
  • 3. Coming home/Leaving home lights
  • 4. Coming home: duration (s)
  • 5. Corner function: activation
    Highlight corners with fog lights when driving on low speed
  • 6. Corner function: regulation
    ECE R119 – works when the steering wheel is turned and when the turn signal is turned on with a 1 second delay
    ECE R48 – only works when you turn the steering wheel
    FMVSS 517 108 – works when the steering wheel is turned and when the turn signal is turned on
  • 7. Corner function: upper speed threshold
    Maximum speed threshold for corner lights activation. Minimum step = 0.5 km/h
  • 8. DRL: Dimming front daytime running lights when turn lights active (Audi style)
  • 9. DRL: DRL menu item in Multimedia system (MMI)
  • 10. DRL: reduce brightness (when active in DRL/sidelights mode)
    For LED DRL
  • 11. DRL: smooth turn on DRL after turn signal was turned off (compatibility: Skoda SuperB MK3)
    Skoda SuperB MY2019
  • 12. DRL: Turn off DRL when parking brake activated
  • 13. DRL: Turn off when light switch in off position
    DRL = Daytime running lights
  • 14. DRL: wink with turn lights
  • 15. Emergency braking: Blink with brake lights
  • 16. Emergency braking: Blink with brake lights (phase 2)
  • 17. Emergency braking: Turn on hazard lights
  • 18. Front fog lights: activate with high beam
  • 19. Front fog lights: Activate with high beam (Skoda Kodiaq/Karoq with LED)
  • 20. Front fog lights: activate with high beam and blink with high beam blink
  • 21. Front fog lights: Activate with high beam, blink fog lights when high beam blinks (Skoda Kodiaq/Karoq with LED)
  • 22. Front fog lights: blink with high beam blink
  • 23. Front fog lights: Blink with High beam blink (Skoda Kodiaq/Karoq with LED)
  • 24. Front side lights: disable when headlights or high beam active (Skoda Kodiaq with HALOGEN headlights)
    Don’t use this with LED headlights!
  • 25. Front turn lights: always active at half power (US style)
    Only for cars with incandescent lamps in turn signals
  • 26. License plate: light type (LED/5W)
  • 27. Light sensor installed
  • 28. Light sensor sensivity
  • 29. Light sensor sensivity: turn on headlights later
    Warning! To revert settings back use Coding history!
  • 30. Light switch with AUTO installed
  • 31. Limit the maximum number of simultaneously burning front lights to 2 types
    This is often used for stroboscope effect
  • 32. Rear fog lights: activate both rear fog light (only Skoda Octavia A7!)
  • 33. Rear side lights: Audi style (compatibility: Skoda Kodiaq)
    Rear side light dimming when rear turn lights are active
  • 34. Rear side lights: Blink with turn lights (VW Tiguan II 3D-LED)
  • 35. Rear side lights: dimm while turn lights are active (Audi Style) for VW Tiguan II with 3D-LED
  • 36. Rear side lights: Turn on when daytime running lights are active (Scandiavian DRLs) (Skoda Kodiaq, etc.)
  • 37. Rear side lights: Turn on when daytime running lights are active (Scandiavian DRLs) for VW Tiguan II with 3D-LED
  • 38. Rear side lights: turn on when daytime running lights are active (Scandiavian DRLs) for VW Tiguan II with LED
  • 39. Rear side lights: wink with rear turn lights
  • 40. Rear side lights: wink with turn lights for Seat Leon 5F
  • 41. Side mirror lights: turn on with 360 camera (AreaView)
    Uses lights in mirrors to highlight environment for cameras in mirrors
  • 42. Stripes/Eyelashes in headlights: blink with turn signals (Skoda Kodiaq/Karoq with LED headlights)
  • 43. Stripes/Eyelashes in headlights: turn on with DRL lights (Skoda Kodiaq/Karoq)
  • 44. Turn lights: polite blinks count
    After applying this option reset light settings to factory defaults in car multimedia menu

Feedback signals

  • 1. Acoustic feedback: activation or deactivation global setting
  • 2. Acoustic feedback: duration when using signal horn
  • 3. Acoustic feedback: menu in MMI
  • 4. Acoustic feedback: use signal horn
  • 5. Acoustic feedback: when locking
  • 6. Acoustic feedback: when second close command
    Quittierton bei zweitem ZV-ZU-Befehl
  • 7. Acoustic feedback: when unlocking
  • 8. Confirmation sound when locking and unlocking central lock
  • 9. Optical feedback: use 3rd brake light
  • 10. Optical feedback: when comfort closing windows
  • 11. Optical feedback: when locking

Interior lights

  • 1. Ambient color selection for multimedia system and dashboard + colors changing with drive mode selection var.1
    Warning! Requires new generation BCM and CAN gateway software ver. >=4344
  • 2. Ambient color selection for multimedia system and dashboard + colors changing with drive mode selection var.2
    Warning! Requires new generation BCM and CAN gateway software ver. >=4344
  • 3. Ambient colors setup: dashboard and MMI (colors #1-10)
    Tap on a color to change it.
    After changing all colors – tap “Apply”.
    Warning: 100% black color with code 000000 equals to “no color” and breaks the list
  • 4. Ambient colors setup: dashboard and MMI (colors #11-30)
    Tap on a color to change it.
    After changing all colors – tap “Apply”.
    Warning: 100% black color with code 000000 equals to “no color” and breaks the list
  • 5. Ambient colors setup: doors (colors #1-10)
    Tap on a color to change it.
    After changing all colors – tap “Apply”.
    Warning: 100% black color with code 000000 equals to “no color” and breaks the list
  • 6. Ambient colors setup: doors (colors #11-30)
    Tap on a color to change it.
    After changing all colors – tap “Apply”.
    Warning: 100% black color with code 000000 equals to “no color” and breaks the list
  • 7. Ambient light color selection: 10 default colors (dashboard and multimedia)
  • 8. Ambient light color selection: 10 default colors (doors lights)
  • 9. Ambient light color selection: 30 colors (alternative color set) – Dashboard and multimedia system
  • 10. Ambient light color selection: 30 colors (alternative color set) – doors lights
  • 11. Ambient light color selection: 30 colors (Dashboard and multimedia system)
  • 12. Ambient light color selection: 30 colors (doors lights)
  • 13. Driving profile #0 Ambient color assignment (car off)
    Choose one of ambient color, that is displayed when driving profile is selected. Possibile variants: 1-10 or 1-30, depending on number of available ambient colors.
  • 14. Driving profile #01 Ambient color assignment
    Choose one of ambient color, that is displayed when driving profile is selected. Possibile variants: 1-10 or 1-30, depending on number of available ambient colors.
  • 15. Driving profile #02 Ambient color assignment (normal)
    Choose one of ambient color, that is displayed when driving profile is selected. Possibile variants: 1-10 or 1-30, depending on number of available ambient colors.
  • 16. Driving profile #03 Ambient color assignment (sport)
    Choose one of ambient color, that is displayed when driving profile is selected. Possibile variants: 1-10 or 1-30, depending on number of available ambient colors.
  • 17. Driving profile #04 Ambient color assignment (off-road)
    Choose one of ambient color, that is displayed when driving profile is selected. Possibile variants: 1-10 or 1-30, depending on number of available ambient colors.
  • 18. Driving profile #05 Ambient color assignment (ECO)
    Choose one of ambient color, that is displayed when driving profile is selected. Possibile variants: 1-10 or 1-30, depending on number of available ambient colors.
  • 19. Driving profile #06 Ambient color assignment
    Choose one of ambient color, that is displayed when driving profile is selected. Possibile variants: 1-10 or 1-30, depending on number of available ambient colors.
  • 20. Driving profile #07 Ambient color assignment (Individual)
    Choose one of ambient color, that is displayed when driving profile is selected. Possibile variants: 1-10 or 1-30, depending on number of available ambient colors.
  • 21. Driving profile #08 Ambient color assignment
    Choose one of ambient color, that is displayed when driving profile is selected. Possibile variants: 1-10 or 1-30, depending on number of available ambient colors.
  • 22. Driving profile #09 Ambient color assignment
    Choose one of ambient color, that is displayed when driving profile is selected. Possibile variants: 1-10 or 1-30, depending on number of available ambient colors.
  • 23. Driving profile #10 Ambient color assignment (snow)
    Choose one of ambient color, that is displayed when driving profile is selected. Possibile variants: 1-10 or 1-30, depending on number of available ambient colors.
  • 24. Driving profile #11 Ambient color assignment (individual off-road)
    Choose one of ambient color, that is displayed when driving profile is selected. Possibile variants: 1-10 or 1-30, depending on number of available ambient colors.
  • 25. Driving profile #12 Ambient color assignment
    Choose one of ambient color, that is displayed when driving profile is selected. Possibile variants: 1-10 or 1-30, depending on number of available ambient colors.
  • 26. Driving profile #13 Ambient color assignment
    Choose one of ambient color, that is displayed when driving profile is selected. Possibile variants: 1-10 or 1-30, depending on number of available ambient colors.
  • 27. Driving profile #14 Ambient color assignment
    Choose one of ambient color, that is displayed when driving profile is selected. Possibile variants: 1-10 or 1-30, depending on number of available ambient colors.
  • 28. Driving profile #15 Ambient color assignment
    Choose one of ambient color, that is displayed when driving profile is selected. Possibile variants: 1-10 or 1-30, depending on number of available ambient colors.
  • 29. Footwell light installed
  • 30. Smooth turn on buttons light
  • 31. Start engine button heart beat (pulsating light)
  • 32. Turn on interior lights when tailgate opened

Lighting adaptations

  • 1. 0 BLK VL B36
    Usually front left turn signal
  • 2. 1 BLK VR B20
    Usually front right turn signal
  • 3. 2 SL VLB10
    Usually front left side light
  • 4. 3 SL VRB21
    Usually front right side light
  • 5. 4 TFL LB4
    Usually front left DRL
  • 6. 5 TFL RB32
    Usually front right DRL
  • 7. 6 ABL LC5
    Usually low beam left
  • 8. 7 ABL RB1
    Usually low beam right
  • 9. 8 FL LB39
    Usually high beam left
  • 10. 9 FL RB2
    Usually high beam right
  • 11. 10 SHUTTER LB23
    Usually low beam left diagnostics
  • 12. 11 SHUTTER RB22
    Usually low beam right diagnostics
  • 13. 12 NL LB45
    Usually left fog light
  • 14. 13 NL RB5
    Usually right fog light
  • 15. 14 LOCKUNLOCK61
  • 16. 15 35 LED Warnblinktaster C48
  • 17. 16 BLK SLB35BLK SL KC9
    Usually left part of front DRL (stripes, etc.)
  • 18. 17 TFL R BLK SRB3TFL R BLK SR KC3
    Usually right part of front DRL (stripes, etc.)
  • 19. 18 BLK HLA60
    Usually rear left turn light
  • 20. 19 BLK HRC31
    Usually rear right turn light
  • 21. 20 BR LA71
    Usually left stop-signal
  • 22. 21 BR RC8
    Usually right stop-signal
  • 23. 22 BR MA57
  • 24. 23 SL HLC10
    Usually rear left side light
  • 25. 24 SL HRA65
    Usually rear right side light
  • 26. 25 KZL HA59
    Usually number plate light
  • 27. 26 NSL LA72
    Usually rear left fog light
  • 28. 27 NSL RC6
    Usually rear right fog light
  • 29. 28 RFL LC11
    Usually rear left reverse light
  • 30. 29 RFL RA64
    Usually rear right reverse light
  • 31. 30 FR LC72
    Usually foot light
  • 32. 31 AMBL 1C61
  • 33. 32 AMBL 2C35
  • 34. 33 AMBL 3C36
  • 35. 34 AMBL 4C37

Long coding

  • 1. 01. Engine
  • 2. 02. Transmission
  • 3. 03. Braking system
  • 4. 04. Power steering
  • 5. 05. Authorization system for access and starting the engine
  • 6. 06. Front passenger seat
  • 7. 08. Heater and climate
  • 8. 09. Onboard supply control unit
  • 9. 09. Onboard supply control unit -> Subsystem 1 (Wipers/Rain sensor)
  • 10. 09. Onboard supply control unit -> Subsystem 2 (RLHS)
  • 11. 0E. Media player 1
  • 12. 10. Parking Assistant 2
  • 13. 11. Engine Electronics No. 2
  • 14. 13. Active cruise control
  • 15. 14. Email system Damping controls
  • 16. 15. Srs
  • 17. 16. Steering column
  • 18. 17. Dashboard
  • 19. 18. Additional heater
  • 20. 19. CAN Gateway
  • 21. 1B. Active steering
  • 22. 21. Energy Management 2
  • 23. 22. Four-wheel drive
  • 24. 23. Increased braking force
  • 25. 25. Immobilizer
  • 26. 26. Electric folding roof
  • 27. 28. Climate Control Panel
  • 28. 32. Differential lock electronics
  • 29. 34. Ride height control system
  • 30. 36. Driver seat adjustment
  • 31. 37. Navigation system
  • 32. 3C. Lane change assistant
  • 33. 3D. Special function
  • 34. 42. Driver door electronic equipment
  • 35. 44. Power steering
  • 36. 47. Acoustic system
  • 37. 51. Electric drive
  • 38. 52. Front passenger door electronics
  • 39. 53. Parking brake
  • 40. 55. Headlights corrector
  • 41. 57. Tv tuner
  • 42. 5F. Electronic Information System 1
  • 43. 65. TPMS
  • 44. 69. Trailer functions
  • 45. 6C. Rear view camera system var.1
  • 46. 6D. Boot lid
  • 47. 6F. Comfort system central module 2
  • 48. 6С. Rear view camera system var.2
  • 49. 71. Charger
  • 50. 75. Emergency Call and Communication Module
  • 51. 76. Parking assistant
  • 52. 77. Telephone
  • 53. 7F. Electronic Information System 2
  • 54. 94. Srs
  • 55. 95. Esp
  • 56. A5. Front Assistant A5
  • 57. BB. Rear door behind driver
  • 58. BC. Rear door behind passenger

Mirrors

  • 1. Activate mirrors heaters when rear window heater activated
  • 2. Close mirrors by holding door keyless sensor
  • 3. Fold mirrors when relocking
    Spiegelverstellung-Spiegelanklappen_bei_Wiederverriegelung
  • 4. Mirror folding options in MMI
    Menuesteuerung Funk Spiegel anklappen
  • 5. Mirror side light active when mirrors are folded
  • 6. Mirrors heaters always active
  • 7. Open side mirrors when unlocking or ignition starting
  • 8. Profile function for folding mirrors
    Spiegelverstellung-Profilfunktion fuer Anklappung der Aussenspiegel
  • 9. Put right mirror down when reversing (mirrors with memory function)
  • 10. Put right mirror down when reversing (mirrors without memory function)
  • 11. Synchronous mirrors adjustment
  • 12. Unfold mirrors function
    Spiegelverstellung-Funk Spiegelanklappen

Multimedia

  • 1. Access trip computer in multimedia when ignition turned off”
  • 2. AM radio
    Enable or disable AM radio
  • 3. AUX input activation
  • 4. Confirmation of installation changes
    Used after updating firmware, parts, POI, etc. to remove error 1555
  • 5. Display call pictures, album covers and radiostations art on Active info Display (AID)
  • 6. Display driving school mode in MMI
  • 7. Display oil level in multimedia system
    Audi TT
  • 8. Eco driving statistics display (green/blue menu)
  • 9. Microphone sensivity
  • 10. Mirror link in motion speed threshold (MIB2)
    Use this to activate MirrorLink in motion
  • 11. Mirror link in motion speed threshold (MIB3)
    Use this to activate MirrorLink in motion
  • 12. MMI USB activation
  • 13. Multimedia developer mode activation
  • 14. Navigation: Compas position on the dashboard
  • 15. Navigation: Data rate (Hz)
    Use this when installing multimedia system with navigation system
  • 16. Navigation: Display compass and navigation on the dashboard
  • 17. Navigation: GNSS Configuration: Beidou
  • 18. Navigation: GNSS Configuration: Default receiver
    Use this when installing multimedia system with navigation system
  • 19. Navigation: GNSS Configuration: External GPS 1
  • 20. Navigation: GNSS Configuration: External GPS 2
    Use this when installing multimedia system with navigation system
  • 21. Navigation: GNSS Configuration: Galileo
  • 22. Navigation: GNSS Configuration: Glonass
    Use this when installing multimedia system with navigation system
  • 23. Navigation: GNSS Configuration: GPS
  • 24. Navigation: GPS receiver
    Use this when installing multimedia system with navigation system
  • 25. Navigation: Navigation type
    Use this when installing multimedia system with navigation system
  • 26. Rear camera installed (MIB2)
    Use this after manual installation of rear view camera
  • 27. Rear camera installed (MIB3)
    Use this after manual installation of rear view camera
  • 28. Region settings (part 1) [MIB3 Only!]
  • 29. Region settings (part 2) [MIB3 Only!]
  • 30. Restart mutltimedia system
    After applying some codings you need to restart your multimedia system for changes to take effect
  • 31. Show offroad screen in multimedia system
  • 32. SMS menu in Multimedia
    Reading and sending text messages over Bluetooth connected mobile phone
  • 33. Startup screen for multimedia system
  • 34. Video in motion speed threshold (MIB2)
    Use this to activate Video in motion
  • 35. Video in motion speed threshold (MIB3)
    Use this to activate Video in motion
  • 36. Wireless connectivity for Apple CarPlay and Android Auto (MIB3)
    Use this to activate wireless connectivity for Apple CarPlay and Android Auto. MIB3 only!

Multimedia: sound quality

  • 1. Activate Skoda Skoda Suround, Virtual Subwoofer (not compatible with CANTON)
    Enables Skoda Suround, Virtual Subwoofer and disables voice transmission to rear passengers. Don’t use with CANTON! MIB3 not supported.
  • 2. Additional amplifier (CANTON, Fender, Dynaudio, etc.) sound processing preset (MIB2)
    This feature changes sound configuration in additional amplifier (unit 47) to improve sound quality.
    WARNING! It takes about 3-5 minutes to read current data and 5-15 minutes to write new value!
  • 3. Change acoustic system coding preset (MIB2)
    Requires acoustic system (Canton, Fender, Dynaudio, etc.) installed
  • 4. Change acoustic system coding preset (MIB3)
    Requires acoustic system (Canton, Fender, Dynaudio, Beats, Harman Kardon etc.) installed
  • 5. Skoda only: individual sound processing preset (MIB2 Entry/Swing 2 before 2017 with SW. ver. 6xxx, MIB2 STD)
    This feature changes sound configuration preset when you have activated Skoda Virtual Subwoofer & Skoda Surround. Not compatible with CANTON!
  • 6. Skoda only: individual sound processing preset (MIB2 Entry/Swing2 after 2017, GP/Swing3 with SW. ver. 7xxx, 8xxx)
    This feature changes sound configuration preset when you have activated Skoda Virtual Subwoofer & Skoda Surround. Not compatible with CANTON!
  • 7. Sound processing preset (MIB2)
    This feature changes sound configuration to improve sound quality
  • 8. Sound processing preset (MIB3)
    This feature changes sound configuration to improve sound quality
  • 9. Sound system type (MIB2)

Roof

  • 1. Open and close sunroof by holding keyfob keys

Seats

  • 1. Comfort entry (driver seat)
    Requires seat with memory function
  • 2. Comfort entry (passenger seat)
    Requires seat with memory function
  • 3. Driver seat fan level 1 high threshold (%)
    Minimum step = 1%
  • 4. Driver seat fan level 1 low threshold (%)
    Minimum step = 1%
  • 5. Driver seat fan level 2 high threshold (%)
    Minimum step = 1%
  • 6. Driver seat fan level 2 low threshold (%)
    Minimum step = 1%
  • 7. Driver seat fan level 3 high threshold (%)
    Minimum step = 1%
  • 8. Driver seat fan level 3 low threshold (%)
    Minimum step = 1%
  • 9. Driver seat heat level 1 high temperature threshold (C)
    Minimum step = 0.25 C
  • 10. Driver seat heat level 1 low temperature threshold (C)
    Minimum step = 0.25 C
  • 11. Driver seat heat level 2 high temperature threshold (C)
    Minimum step = 0.25 C
  • 12. Driver seat heat level 2 low temperature threshold (C)
    Minimum step = 0.25 C
  • 13. Driver seat heat level 3 high temperature threshold (C)
    Minimum step = 0.25 C
  • 14. Driver seat heat level 3 low temperature threshold (C)
    Minimum step = 0.25 C
  • 15. Lumbar massage: driver’s seat
    Temporarily activates a lumbar massage using an electric lumbar support. Requires power seats with memory function. Does not work if the vehicle is in motion.
  • 16. Lumbar massage: passenger seat
    Temporarily activates a lumbar massage using an electric lumbar support. Requires power seats with memory function. Does not work if the vehicle is in motion.
  • 17. Passenger seat fan level 1 high threshold (%)
    Minimum step = 1%
  • 18. Passenger seat fan level 1 low threshold (%)
    Minimum step = 1%
  • 19. Passenger seat fan level 2 high threshold (%)
    Minimum step = 1%
  • 20. Passenger seat fan level 2 low threshold (%)
    Minimum step = 1%
  • 21. Passenger seat fan level 3 high threshold (%)
    Minimum step = 1%
  • 22. Passenger seat fan level 3 low threshold (%)
    Minimum step = 1%
  • 23. Passenger seat heat level 1 high temperature threshold (C)
    Minimum step = 0.25 C
  • 24. Passenger seat heat level 1 low temperature threshold (C)
    Minimum step = 0.25 C
  • 25. Passenger seat heat level 2 high temperature threshold (C)
    Minimum step = 0.25 C
  • 26. Passenger seat heat level 2 low temperature threshold (C)
    Minimum step = 0.25 C
  • 27. Passenger seat heat level 3 high temperature threshold (C)
    Minimum step = 0.25 C
  • 28. Passenger seat heat level 3 low temperature threshold (C)
    Minimum step = 0.25 C
  • 29. Retention of driver’s seat heater level
  • 30. Retention of passenger’s seat heater level

Service and maintenance

  • 1. AISIN automatic transmission service procedures
  • 2. Distance since last mileage-dependent inspection (km)
  • 3. Distance since last service (km)
    Step #1 for reseting service reminder
  • 4. DPF service regeneration while driving
  • 5. DPF service regeneration while standing
  • 6. DSG adaptation (DQ200, DQ250, DQ500)
  • 7. DSG adaptation (DQ381)
  • 8. Electric parking brake service routines
  • 9. Haldex V electric pump adaptation
    Use this after replacing Haldex fluid or repair
  • 10. Mass DTC clear in most of units
    This feature clears DTC codes in most of units in just one click (takes 1 second)
  • 11. Max. distance until next mileage-related inspection (km)
  • 12. Max. time until next time-dependent inspection (days)
  • 13. Maximum distance between service (km)
    Step = 100 km
  • 14. Maximum distance to service
    Step = 100 km
  • 15. Maximum time between service (days)
  • 16. Minimum distance between service (km)
    Step = 100 km
  • 17. Minimum time between service (days)
  • 18. Reset value for next mileage-dependent inspection (km)
  • 19. Reset value for next time-dependent inspection (days)
  • 20. Service interval reminder state
    Step #3 for reseting service reminder
  • 21. Time since last service (days)
    Step #2 for reseting service reminder
  • 22. Time since last time-dependent inspection (days)
  • 23. Transfer fuel pump test
    Used to fill fuel system after parts replacing

Service reminder reset

  • 1. Reset inspection service reminder
    One click solution to reset inspection service interval
  • 2. Reset oil service reminder
    One click solution to reset oil service interval

Sounds and alarm

  • 1. Alarm on door opening with ignition turned on
  • 2. Seat belts alerts
  • 3. Seat belts alerts style
  • 4. Sound beep when closing/opening tailgate (with electric actuator)
    By default it’s enabled

Tire pressure monitoring system (TPMS)

  • 1. Comfort: Front axle pressure (x10 kPa)
    For TPMS system with wheel sensors (TPMS/RDKS)
  • 2. Comfort: Rear axle pressure (x10 kPa)
  • 3. Disable direct TPMS system
    Disables direct TPMS system (with sensors in wheels) so you can enable indirect TPMS system
  • 4. Fully loaded: Front axle pressure (x10 kPa)
    For TPMS system with wheel sensors (TPMS/RDKS)
  • 5. Fully loaded: Rear axle pressure (x10 kPa)
  • 6. Indirect TPMS system activation
    Uses ABS sensors to warn about low pressure in tires
  • 7. Indirect TPMS system activation patch for Parking assist/Park pilot
    Apply this patch after activation of Indirect TPMS system, if your car is equiped with Parking assist/Park pilot (automatic parking system)
  • 8. Load status selected
    For TPMS system with wheel sensors (TPMS/RDKS)
  • 9. Reset TPMS adaptation (for TPMS based on ABS sensors)
  • 10. Standard: Front axle pressure (x10 kPa)
    For TPMS system with wheel sensors (TPMS/RDKS)
  • 11. Standard: Rear axle pressure (x10 kPa)
  • 12. TPMS menu in Multimedia system

Wipers and washers (windshield, rear glass, headlights)

  • 1. Front wipers end position (°)
    Minimum step = 0.0109890001°. Car Scanner would fix that for you, choosing closest possible value.
  • 2. Front wipers service position (°)
    Minimum step = 0.0109890001°. Car Scanner would fix that for you, choosing closest possible value.
  • 3. Front wipers start position (°)
    Minimum step = 0.0109890001°. Car Scanner would fix that for you, choosing closest possible value.
  • 4. Headlight washer duty duration
    Minimum step = 10 ms
  • 5. Headlight washer interval
    Headlight washer interval runs at X washes of windshield. To disable automatic front light washer, change this value to 0
  • 6. Park windshield wipers after ignition turned off
  • 7. Park wipers when opening hood
  • 8. Rear fog lights turned on warning when reaching speed limit
    Minimum step = 1 km/h, set 0 to disable warning
  • 9. Rear wiper automatic function
  • 10. Rear wiper comfort function
  • 11. Reduce washer delay
  • 12. Stop wipers when opening hood
  • 13. Teardrop mode (additional wipers pass) on the rear glass
  • 14. Teardrop mode (additional wipers pass) on the windshield
  • 15. Turn on headlight washer after holding washer lever for XX ms
    Minimum step = 10 ms
  • 16. Whipers finish cycle after ignition turned off
  • 17. Windshield wiper service position activation through menu option
    Compatibility depends on installed MMI device.
  • 18. Wipers menu in multimedia system (MIB3 only)

Other

  • 1. Automatically close windows when rainy
    Compatibility depends on car model, trim and rain&light sensor model
  • 2. Distance left for deactivation of transport mode (power saving mode)
  • 3. Driver door comfort closing and opening
    Window would go a bit down and up to make door closing easier
  • 4. Front fog lights: turn on fog when reversing
  • 5. Light switch with fog lights switch installed
  • 6. Passenger door comfort closing and opening
    Window would go a bit down and up to make door closing easier
  • 7. Personalization: activation
    Remember settings for different keys
  • 8. Personalization: Patch for driver seat with memory function
  • 9. Start-stop function deactivation (climate unit method)
  • 10. Start-stop function deactivation (temperature method)
    This method compatibility depends on your car. On newer cars VAG disabled this method.
  • 11. Start-stop function deactivation (voltage method)
    This method compatibility depends on your car. On newer cars VAG disabled this method.
  • 12. Transport mode (power saving mode)
    Reduces battery drain while car turned off

Information valid for version 1.76.5/1.76.6.

WARNING!
1) Coding & Service requires good ELM327 with full command set support.
2) Coding compatibility may depend on your car trim level and control units versions.
Custom sensors (PIDs)

Car Scanner allows you add custom sensors (also known as “custom PIDs”) to get data, defined by your car manufacturer.

To create custom sensor you need to know at least 2 things:
1. How to make a request to ECU to get the data you need:
Command = Mode + PID,  e.g. 010C for engine RPM
Header = address where to send request, e.g. 7E0 for CAN 11bit protocol. You can leave header blank. In that case default functional header for current protocol would be used. Most of custom PIDs requires correct header!

2. How to decode received data: Formula (Equation).
To point at certain bytes in response use latin letters: A, B, C, D .. Z, AA, AB, .. AZ, BA, BB, .. BZ, … etc. , where letter A stands for 1st byte in response, letter B stands for second byte in response, etc.
Attention! Formula is case sensitive!
To determine first byte, Car Scanner skips some bytes in response from ECU: header bytes, data length, response to certain mode marker (e.g. mode 01 -> response marker 41) and PID id.
Example: request 010C (engine RPM) would give you response: 7E804410C0C9C, where Car Scanner would skip 7E804410C.
So we have only 0C9C data left.
Letter A would mean 0C, letter B would mean 9C

You can use mathematical operators like *, /, , +. Example: A+B
To change calculation order use brakets ( ), like: (A*256+B)/4
You can use floating point numbers in formula using dot “.”: e.g. A+13.54

Bitwise functions supported:
Bitwise unary complement: @~
Bitwise AND: @&
Bitwise exclusive OR: @^
Shift left: @<<
Shift right: @>>
Examples: A@<<16, C&7, etc.

Additional functions (funtion arguments should be always separated by “,“):
GetBit(A,N), where A – byte number, N – bit number, from 0 to 7
SIGNED(A), signed(A), Signed(A) – treat byte as signed (-128 .. 127)
ShortSigned(A,B) – treat 2 bytes as 16-bit signed value
And(A,B) – bitwise AND, same as A@&B
Shr(A,B) – bitwise shift right, same as A@>>B
Shl(A,B) – bitwise shift left, same as A@<<B
MAX(A,B) – returns maximum value from A and B
MIN(A,B) – return minimum value from A and B
abs(A) – return unsigned value, e.g. abs(-1)=1, abs(-123456)=123456, abs(123456)=123456
FLOAT32(A,B,C,D), float32(A,B,C,D) – returns IEEE 754 floating point value from 4 given bytes.
FLOAT64(A,B,C,D,E,F,G,H), float64(A,B,C,D,E,F,G,H) – returns IEEE 754 floating point value from 8 given bytes.
if(A,B,C) – logic function, if A=1, returns B, else returns C. You can use “=” or “<” or “>” for comparison.
Example: if(A>5;5;A).  If A greater than 5, return 5, else return A. With A=6 this would return 5. With A=3 this would return 3.
SetVar(key,value) – store in memory some value. Car Scanner has a key-value dictionary, that is shared for all pids. Key – any integer number, e.g. 0, 1, 2, 3, 9999. Value – any value, e.g. 45.24. Returns the same value.
SetVarOnce(key,value) – store in memory some value, ONLY if it is  not stored there yet (with the same key). Returns the same value.
GetVar(key,default_value) – get value from dictionary previously set by SetVar or SetVarOnce. If value doesn’t exist in shared dictionary yet, returns default value. Example: GetVar(123,789.244) – returns value, stored in key 123, but if there’s no value with such key it returns 789.244
You can refer other sensors by 2 ways:
1) PID(ID) or pid(ID) – get other sensor value, where ID is sensor ID (you can check ID in Settings -> Sensors). Example: PID(5)
2) {name}, where name – is exact pid full name (case sensitive). Example: {Fuel temperature}

You can add commands, that would be executed BEFORE and after requesting PID (Start diagnostic command and stop diagnostic commands). This commands should be fully qualified ELM327 commands, separated by “;” or “,” or “\”. Example: ATCRA7E8,ATFCSH7E0,ATFCSD300000

Action PIDs.
Action PIDs are executed when you tap on them. Response is not decoded.
Example of usage: create custom action pid for some command, that starts a routine, like forced DPF regeneration.
Don’t forget, you still need to know header and command for that.

Name and Short name fields can be entered as you wish.
Minimum and maximum fields can be skipped.

How to find malfunctioning ABS sensors on Toyota Land Crusier Prado 150

Warning! Car Scanner capabilities of reading different data are not the same for all cars! The list of supported sensors depends on the vehicle and the selected connection profile!

One day, my work colleague saw a bunch of warning inidicators on his Toyota Land Cruiser Prado 150 (2010) dashboard. The ABS, ESP, power steering, all-wheel drive and other lights came up.

Moreover, the main difficulty was that the lamps went out and then appeared again and, unfortunately, when he tried to read DTC code, there were no DTC in memory and warning indicators were off.
So, the problem was floating, not always repeating. According to the owner of the car, at the time when the warning lights came on, ABS and ESP system stopped working too.

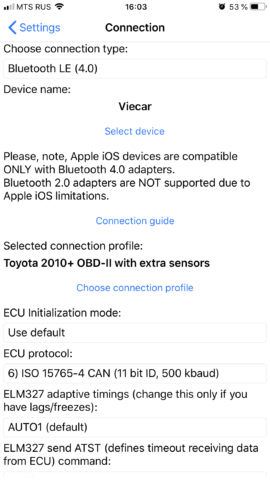
I suggested to check the ABS sensors, because a lot of systems in modern cars actually depends on ABS sensors. To do this, the Toyota 2010+ OBDII with extra sensors connection profile was selected in Car Scanner. This connection profile allows you to get the speed of each wheel individually.

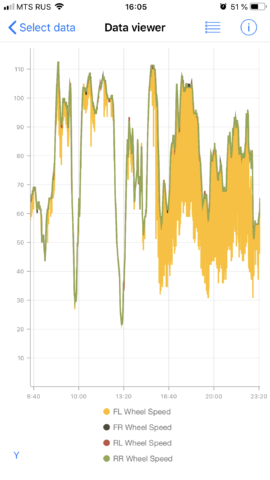
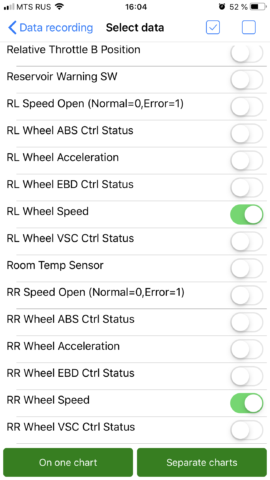
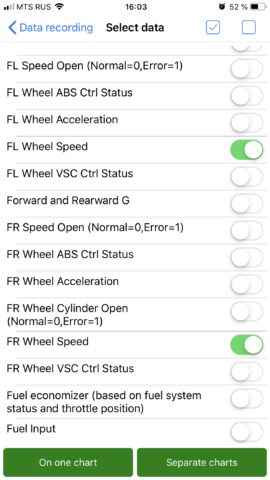
Then in the Dashboard we create a page with 4 sensors and set them up: FL wheel speed, FR wheel speed, RL wheel speed, RR wheel speed. I also make sure that the owner has data recording enabled in Car Scanner.

The owner goes to ride with Car Scanner, on the screen of which the dashboard panel with wheels speed is displayed. The next day, we opened Data recording, found data record file selected four parameters that we already know (FL wheel speed, FR wheel speed, RL wheel speed, RR wheel speed) for displaying on one chart.

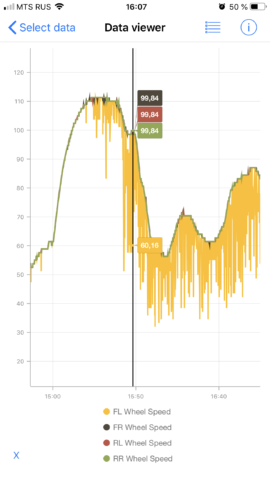
And carefully look at the graph: three wheels all the time showed approximately the same speed (taking into account the tolerances in the corners), and one – the front left (displayed in yellow on the graph) gave the correct speed, then 20-40 km/h less. The speed on this wheel changed chaotically and unrealistically, especially comparing to 3 other wheels.

It immediately became clear that the problem was either in the front left wheel sensor itself or in the wiring to this sensor. Most likely due to the fact that some data from the sensor were received by the brain, and these data were 50% correct, the system could not unambiguously determine what the problem was.

After replacing the front left ABS sensor, the problem went away and did not occur again.


Data recording

Car Scanner provides you with the ability to record data received from a car for further evaluation or processing.

Recording data

In order to enable data recording, go to Data recording on the main screen and turn on the “Data recording” switch (enabled by default).
This can be done while Car Scanner is connected to the car, but I recommend doing it before connecting.

Before you begin, you need to understand a few simple rules:

  1. Car Scanner records only the data that is displayed on the screen.
    Example: if you want to record engine load and engine RPM, set “Dashboard” or “Live data” to display them.
  2. In addition to the displayed data, the data that comes with the requested data is recorded too.
    Example: when you request an oxygen sensor voltage, the answer from ECU always contains a short-term fuel trim (STFT). If you set Live data or Dashboard to show only oxygen sensor voltage on the screen, then you will see oxygen sensor voltage and short-term fuel trim in the saved file.
  3. If you set Car Scanner to display a parameter that depends on another parameter, then the output parameter, all parameters on which it depends, and all other parameters that have the same dependencies will be recorded.
    Example: if you set Car Scanner to show “Vehicle speed”, then in the saved file you will get “Vehicle speed”, “Average speed” and “Total distance”.
  4. If you turned on the parameter “Always calculate and save fuel consumption”, then in addition to the above parameters, all parameters related to fuel consumption and all parameters on which the calculation of consumption depends will be recorded.
  5. The file with the record is saved in two cases: when you click on the “Disconnect” button and when you turn off the “Record data” option.
    If you exit the program before disconnecting from the car or go to the “Data recording” section during recording, you will not find the file with the current recording there.
  6. Only data that has a numeric value is recorded. Data with a text value is not recorded.

Viewing recorded data

In order to view the recorded data, go to Data Recording and tap on the desired file.
You will see a list of recorded parameters. Select the ones you want to display by ticking them.
You can choose one of two options for data presentation:
1. Display of each selected parameter on a separate chart
2. Display all selected parameters in the general graph.

When viewing, you can scale and scroll through the graphs. In the mode of the combined graph, you can select the zoom mode: along the X axis, along the Y axis, or along both axes simultaneously.
If you hold your finger on the chart, you will see the current value of the indicator at the selected point.

Export Recorded Data

You can export the recorded data in order to open it on a PC or Mac, or to share it with other Car Scanner users.
Export is possible in two formats: CSV and BRC.
CSV is the simplest format of spreadsheets and you can open it with a notepad or MS Excel or similar other apps.
BRC is an internal data storage format. It can only be read by the Car Scanner program.
The export process is different for iOS and Android versions!

Method number 1 for iOS:
1) Swipe from right to left on the file that you want to export, click “More” and “Share
2) Select the format you want: CSV or BRC
3) Select the app to export. You can use the mail client, instant messengers, cloud storage (Dropbox, etc.)

Method number 2 for iOS (you need a Mac or PC, iTunes, export is possible only in BRC format):
1) Connect your iPhone / iPad to a Mac or PC and wait for it to appear in iTunes
2) Click on the connected device in iTunes and go to “Shared Files”
3) Select the program Car Scanner
4) Find the file you need in the list and simply drag it to the desktop or to any other folder on your Mac or PC.
Read more about working with the “Shared Files” feature here: https://support.apple.com/HT201301

Method number 1 for Android:
1) Hold your finger on the file you want to export, and on top you will see the “Share” button (maybe it will be hidden under the button with three dots – it depends on the size of the screen of your device).
2) Select the format you want: CSV or BRC
3) Select the program to export. You can use the mail client, instant messengers, cloud storage (Dropbox, etc.)

Import Recorded Data

ATTENTION! Import only files in BRC format! Importing entries in CSV format is not possible!
Importing proccess is different for iOS and Android!

Import to iOS (you need a Mac or PC, iTunes):
1) Connect your iPhone / iPad to a Mac or PC and wait for it to appear in iTunes
2) Click on the connected device in iTunes and go to “Shared Files”
3) Select the program Car Scanner
4) Drag and drop the file you need into the window with the Car Scanner files in iTunes.
Read more about working with the “Shared Files” feature here: https://support.apple.com/HT201301

Import to Android:
Just click on the .BRC file (in the email application or in the file manager). Car Scanner will be launched and you can find the recording file in the Data Recording section.

Other features

By default, the files are named with the start date of the recording in the format YEAR-MONTH-DAY HOUR-MINUTE-SECOND.
You can rename them:

1) iOS: Swipe from right to left over the file you want to export, click the “More” and “Rename” buttons.
Android: Hold your finger on the file you want to export, and on top you will see the “Rename” button (maybe it will be hidden under the button with three dots – it depends on the size of the screen of your device).
2) Enter the desired file name. Please note that there are characters that cannot be in the file name!
3) Tap “OK”.

You can delete one or all entries.
Delete one record:
iOS: Swipe from right to left on the file that you want to export, click the “Delete” button, confirm the deletion.
Android: Hold your finger on the file you want to export, and you will see the “Delete” button on top (maybe it will be hidden under the button with three dots – it depends on the screen size of your device), confirm the deletion.

To delete all entries, click the trash can button and confirm deletion.


Optimizing connection speed

Tips for increasing the speed of reading parameters

1. First of all, you need to understand that the number of parameters polled at the same time affects the reading speed most of all.
The more sensors are read in turn, so the more parameters the Car Scanner needs to read, the more time it takes to read each one.
For example, if reading one parameter takes 100 ms, then reading 4 parameters takes 400 ms.
Enabling “Always read and calculate fuel consumption” feature also negatively affects the speed of reading the parameters.
Therefore, if the reading speed is important for you, try to reduce the number of parameters, that are requested at the same time.

2. For cars operating under the CAN 11bit and CAN 29bit protocols, you can enable Request optimization (Settings – Adapter – Advanced settings – Optimize requests for faster data reading). Enabling this function can accelerate simultaneous reading of several parameters up to 6 times.

3. Configuring the timeout for the adapter to receive data (Settings – Adapter – Advanced settings – ELM327 send ATST command). This command determines the time interval after which the adapter considers that there will be no new data from the ECU and passes them to the program. The lower the value (for example Send 8), the faster the data exchange, but the connection to the ECU will be less stable. Too low values ​​will not allow the ECU to be connected at all. High values ​​(96 and FF) are used to improve the stability of the connection by reducing the speed.
Thus, you need to gradually reduce the value of the Send ATST command and check the stability of the connection. After changing the Send ATST command, you must reconnect to the computer! Changing a setting does not affect an already established connection.
For example, on my car – Kia Sportage SL 2014 with Viecar Bluetooth 4 adapter I get highest speed with ATST=16, but sometimes packets are lost. 100% stable connection with ATST=32. But with a crap cheap adapter I can’t get stable connection even with ATST=64.

Some cars like old Volkswagen, Audi, Skoda requires high ATST values like 96.

4. If you want to get readings, received from different control units (for example, from the engine block and from the automatic transmission unit), then this increases the polling time even more, because. before each request, Car Scanner have to spend some time reconfiguring the ELM327 adapter to work with the new control unit (engine, automatic transmission, etc.).
Therefore, in order to achieve maximum speed, it is recommended to interrogate parameters located in one control unit.

Configuring Bluetooth connection on Android

First of all make sure, that you have OBDII ELM327 adapter with Bluetooth.

You should plug it inside the diagnostic socket in your car (known as “OBDII socket”) and turn on ignition or start the engine. If your adapter has a power button on it’s body – press it.

Step #1: Pair your phone/tablet with OBD2 adapter. If you have already done that – skip to Step #2.

WARNING! Depending on different Android versions, pairing may be done in some other way.

Open Android settings and locate Bluetooth section. Turn on Bluetooth and wait until your adapter would be discovered.

Usually it’s called “OBDII”, “obd2” or something like that. If it’s branded, it could be called as it’s brand (e.g. “Viecar”, “VLink”, etc.). Please, note, that it’s NEVER called like your car brand or “MY CAR” or something like that.

Tap on it to pair your phone/tablet with OBD2 adapter. Adapter would ask you for PIN-code.

If you don’t know PIN code, check your adapter documentation. Usually it’s “1234”, “0000”, “7890” or “1111”.

Step #2: Select adapter in Car Scanner.

Open Car Scanner and go to Settings (gear icon in the top-right corner)

Tap on “Adapter” (in old versions – “Connection”)

Select Connection type: Buetooth

Tap on “Select device” and you’ll see device selection screen.

Tap on your adapter’s name.

That’s all, now you have adapter selected and you need to go back and tap on big green “Connect” button.

Next time all you need to do is just tap on “Connect” button

Don’t forget to press power button on your adapter before connecting, if it has one.

Configuring Wi-Fi connection to ELM327 adapter

First of all make sure, that you have OBDII ELM327 adapter with Wi-Fi connection type. You should plug it inside the diagnostic socket in your car (known as “OBDII socket”) and turn on ignition or start the engine. If your adapter has a power button on it’s body – press it.

Step #1: Open your Phone/Tablet Wi-Fi settings (NOT Car Scanner settings) and turn on Wi-Fi.

Locate Wi-Fi network, created by ELM327 OBDII adapter and connect to it.

Usually it’s called “OBDII”, “OBD2”, “WIFI_OBDII” or something like that. Sometimes it’s name has something familiar with your adapter brand (e.g. VGate adapters usually have “VLINK” network name).

Most of adapters doesn’t require password for WiFi network, but if your adapter requires that – follow documentation that comes with your adapter.

Please, note, that it’s NEVER called like your car brand.

iOS
Android

Step #2. Car Scanner setup.

Open Car Scanner and go to Settings (gear icon in the top-right corner).

Tap on “Adapter” (in old versions – “Connection”)

Select Connection type: Wi-Fi

Make sure that you have correct adapter IP address and port. For most cases it’s IP address is 192.168.0.10 and port is 35000, but some adapters have different settings, so you should check documentation that comes with your adapter.

That’s all! Now all you need to do is tap on big green “Connect” button that’s located.

When you want to connect next time, just make sure that you’re connected to OBD2 WiFi network and tap on “Connect” button.


 iOS Wi-Fi connection troubleshooting


Configuring Bluetooth 4.0 (LE) connection on iPhone/iPad

First of all, make sure that you have an OBD2 ELM327 adapter that works via Bluetooth 4.0 (LE). Pay attention to the Bluetooth version! Apple iOS devices support only Bluetooth 4.0 adapters. Older Bluetooth adapters are not supported. This limitation of the operating system Apple iOS. For more information, read article about choosing propper ELM327 adapter.

You need to insert the adapter into the diagnostic socket (also known as the OBD2 connector) and turn on the ignition or start the engine. If your adapter has a power button on the case, press it.

Make sure that Bluetooth is enabled on your iPhone / iPad.

Attention! Unlike Android devices, you don’t need to setup pairing with adapter in the iPhone / iPad system settings!

Step 1: Launch the Car Scanner and go to Settings (click on the gear icon in the upper right corner).

Step 2: Select “Adapter” (in old versions – “Connection”)

Step 3: Select “Connection Type”: Bluetooth 4.0 (LE)

Step 4: Click the “Select Device” button. You will be taken to the Bluetooth LE (4.0) nearby device search window.

Step 5: Wait until your adapter is detected and click on it. If the adapter is not found within 5-10 seconds, click on the “Update” button to retry the search.

Usually the adapter is called “OBDII”, “obd2” or something like that. If this is a branded adapter, then its name can be similar to its brand (for example “Viecar”, “VLink”, etc.). Please note: adapters are never called as a car brand, “MY CAR” or something similar. And, the adapter always has a name. Devices without a name, only with the address of the form {…} are not adapters.

Attention! If after several attempts your adapter is not discovered, it means that it has an outdated (<4.0) version of Bluetooth that is not compatible with Apple iOS.

Step 6. Select your adapter in the list of detected devices and wait for the compatibility check with Car Scanner.

That’s all, connection setup is complete. Now you need to click on the big green “Connect” button on Car Scanner main screen.